

Attach Fan To Raspberry Pi 4
How to install a fan onto a Raspberry Pi and get in run dynamically
In my previous article I wrote well-nigh what a Raspberry Pi was and why you should consider buying i. I of the main gripes with the electric current fourth generation Raspberry Pi is that it does become quite hot under heavy load. The fourth generation Raspberry Pi does "throttle" the CPU which ways that it slows the processing down so to forbid the device from over-heating. This is proficient only you actually want the Pi to perform well and be cooled accordingly. So what you really need a good cooling solution for your Raspberry Pi. Add to this the fact that the Raspberry Pi does non ship with a case and then we could do with this too.
There are two cooling solutions for the Raspberry Pi; active cooling and passive cooling. Active cooling involves the use of a concrete rotating fan to cool the primal processing unit of measurement (CPU) whereas passive cooling involves the utilise of heat sinks; pieces of jagged metal to dissipate the rut. Active cooling is far more constructive than passive cooling at reducing the temperature of the CPU which was the reason I opted for a fan to absurd my Raspberry Pi. (If you don't believe me check out YouTuber Chris Barnett's video of comparison cooling solutions on a Raspberry Pi 4).
So a example with a mounted fan would exist ideal, hence I purchased the 'GeeekPi Raspberry Pi 4 Acrylic Case, Raspberry Pi 4 Example with Fan(Blue Light) and Raspberry Pi 4 Heatsinks For Raspberry Pi 4 Model B, Compatible with Raspberry Pi ICE Tower Fan(Black and Clear)' from Amazon for £6.49 ($8.96).
When information technology arrived, I connected it up to my Pi and voila, it started upwards and the fan spun up and did its job cooling the Pi constantly. Simply I wanted to take things a little further and thought about dynamically controlling the fan according to the CPU temperature. After a bit of Googling I came across the post-obit site: https://howchoo.com/thousand/ote2mjkzzta/command-raspberry-pi-fan-temperature-python. "Bees knees" I thought until I got to part three — build the exam circuit. This was where hit an impasse. The problem I faced was not having a breadboard and excursion also I'thousand no electrical engineer and so knowing how to make this was a picayune also circuitous for my liking.
Later on some more than Googling I came across this site: https://www.tindie.com/products/jeremycook/ez-fan2-tiny-raspberry-pi-fan-controller/ An engineer by the name of Jeremy Cook has created a minute printed circuit board (PCB) that sits betwixt the fan connectors and the GPIO connectors of the Raspberry Pi. So I purchase information technology, with the post-obit add-ons: Clear Heat Shrink, Female ~8cm connector wires which came to $9.95 plus shipping to the Uk which price $15 (more than the item, merely I thought information technology would be worth it), which brings the total cost to $23.99 USD. (Note if you are in the United kingdom check out the Fan Controller for Raspberry Pi sold on thePiHut for only £iv.xx)

Cheque out Jeremy Melt'southward YouTube video on how he fabricated it and installed it; https://world wide web.youtube.com/scout?five=AdjU_AVcZTA. At 5:59 Jeremy shows a GPIO schematic of how to connect the wires to the EZ Fan 2.
Here'south my installation of the EZ Fan two connector:
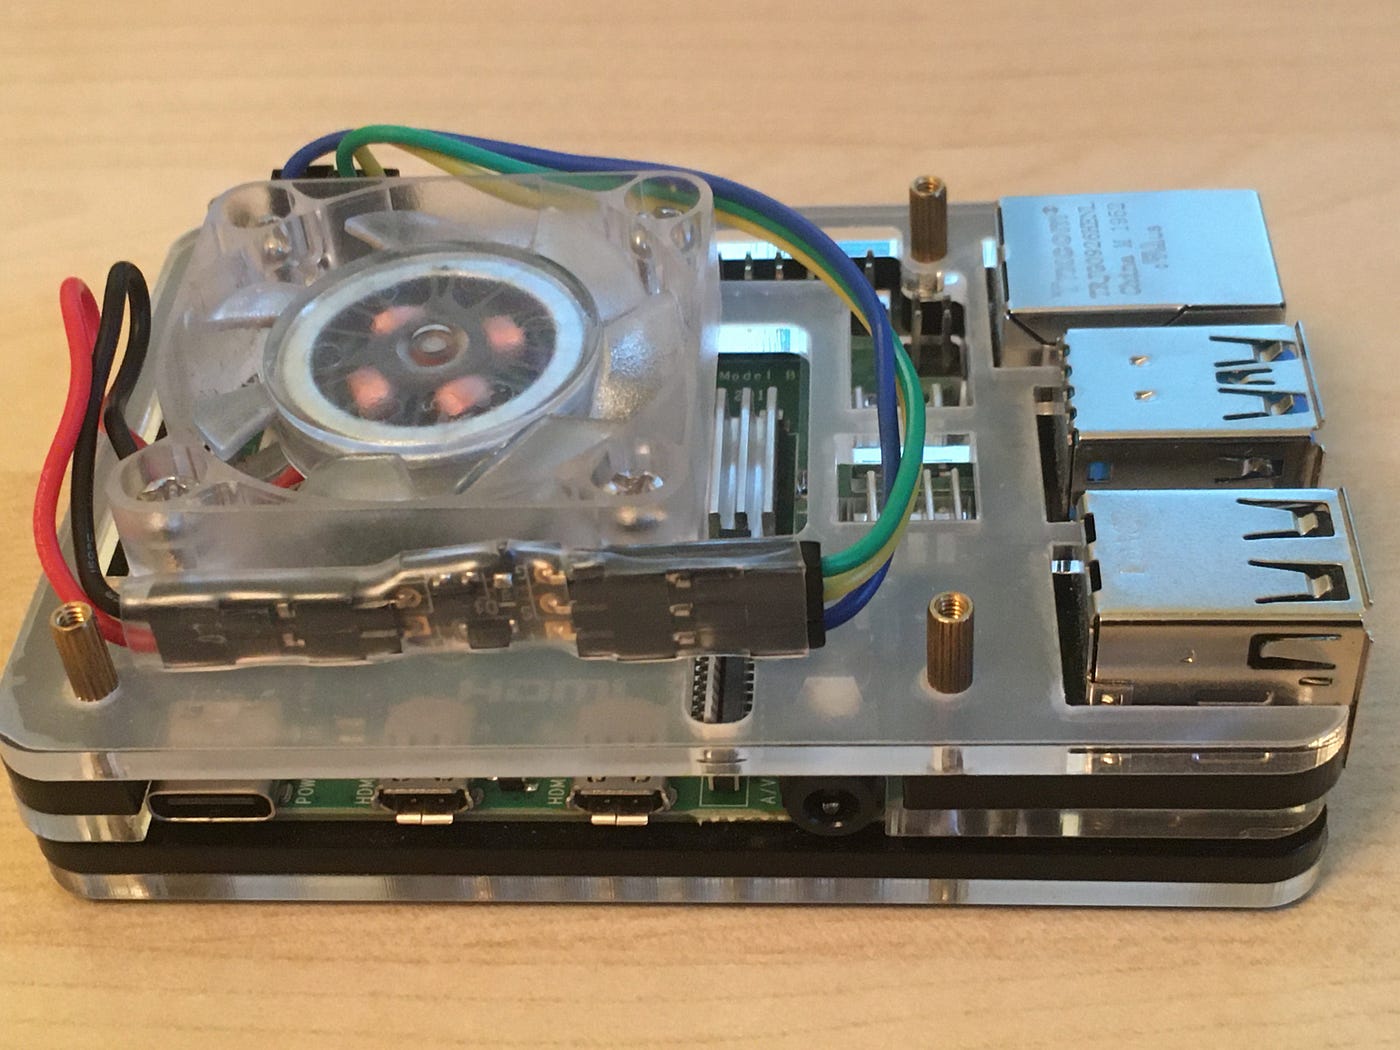
Notice, dark-green wire is on the top, yellow in the middle and blueish at the lesser.


GPIO ports 2, 6 and 8 were used as per schematic:
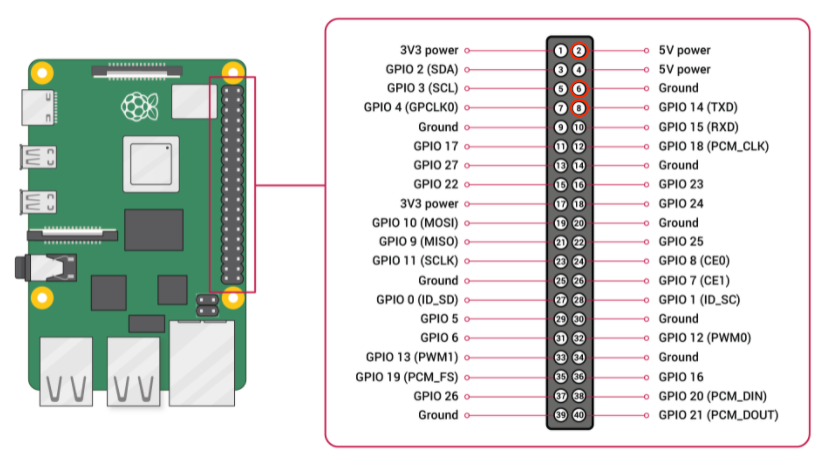
Blue wire — port two; 5V power
Connector spacer — port four; 5V power
Greenish wire — port 6; Ground
Xanthous wire — port 8; GPIO 14 (TXD)
Now for the beat out script to get in work dynamically
Access the following link: https://howchoo.com/g/ote2mjkzzta/control-raspberry-pi-fan-temperature-python and scroll down to function four — Use the install script and follow the steps verbatim (Pre-requisites: requite your Raspberry Pi a static IP address, connect it to your router either via ethernet (preferred) or WiFi. Y'all'll also need to enable secure shell (SSH) on the Raspberry Pi and SSH into it).


That's information technology! All done. Since we've used the installer script in step 4 of https://howchoo.com/one thousand/ote2mjkzzta/control-raspberry-pi-fan-temperature-python it has already been registered to run on boot.
Reboot the Raspberry Pi with the following command:
sudo reboot This will reboot your Pi and your fan should exist running dynamically.
Time to test it…
- Access the check_fan directory and create a file called measure_temp.py in nano
- Re-create/paste this into the file:
#!/bin/bash while [ truthful ] exercise myTemp=`/opt/vc/bin/vcgencmd measure_temp | egrep -o '[0-9]*\.[0-nine]*'` myDate=`date '+%Y/%m/%d %H:%Thousand:%S'` echo $myTemp $myDate slumber iii done
3. Salvage the file and exit using the ctrl+z keys
4. Requite the file executable attribute by typing:
chmod +10 measure_temp.py 5. The run above script:
./measure_temp.py The moment the temperature rises to above 51 degrees the fan is activated and the temperature is bought downwards to twoscore degrees after which the fan switches off.
So there y'all have an cheap fan and a script to dynamically control the fan of your Raspberry Pi. Delight leave a comment if yous accept whatsoever questions, concerns or comments. If you've managed to replicate this and information technology'southward worked for you please leave a handclapping… :-)
Source: https://medium.com/codex/how-to-install-a-fan-onto-a-raspberry-pi-and-make-it-run-dynamically-4ff0e59985fc
Posted by: dillplarecturs.blogspot.com
0 Response to "Attach Fan To Raspberry Pi 4"
Post a Comment